ATTLER is the miniature-size mobile robot platform for autonomous drive and AI development.
The key of the ATTLER is “Simple, Reliable and Effective”. All you need for developing robots is included there!
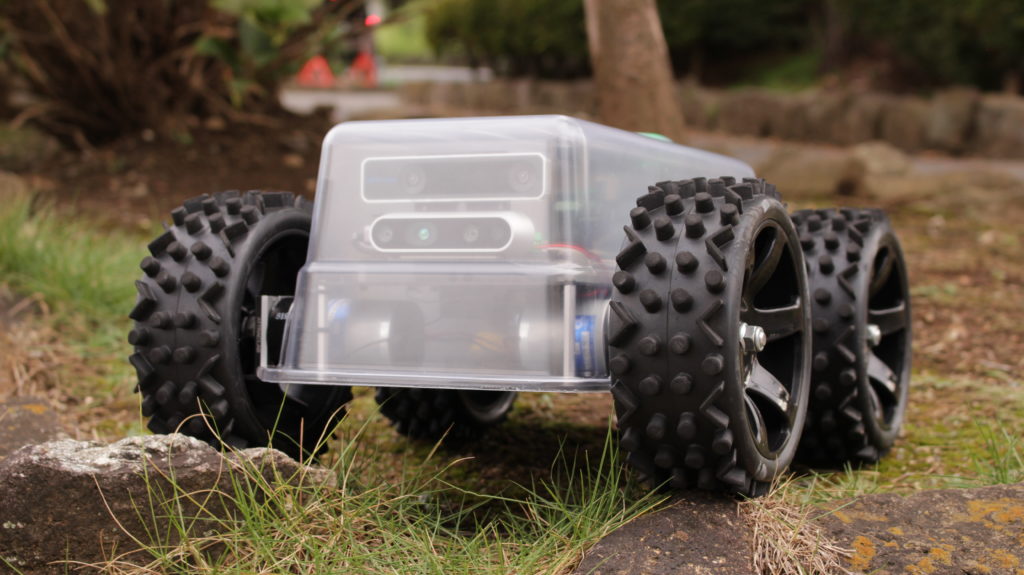
ATTLER is designed for toughness and flexible to modify. Because we know developers like to change stuff, try new things, or modify some parts by themselves, so the cart is just simple but remains durability. It can operate both indoor and outdoor with the top speed of of 3.2 m/s, fast enough to run autonomously in many applications, and compact for a single developer to handle it by him or her selfs.
The thing is you don’t need the super fast or super powerful robot for just testing your idea or some features. You may need something that easy for you to carry around, compact in size, and harmless. So in case the robot is malfunction or goes out of control…you don’t want the robot to go hurt people around or break something, or even break itself!
For the sake of simplicity and just focus on our high-level application, we are using open source autopilot software from Ardupilot. The CUBE mini purple is the good choice to go for and quite enough for a rover application. Ardupilot is one of the most well-known open source project for unmanned autonomous vehicle, there are copter, plane, boat, submarine and of course rover. Their documentation is written pretty clear and easy, please check more detail on this link https://ardupilot.org/ardupilot/. It is really easy to follow up step-by-step, once your hardware is setup, like an ATTLER, you are ready to rock-and-roll in the robotics world!

Hardwares
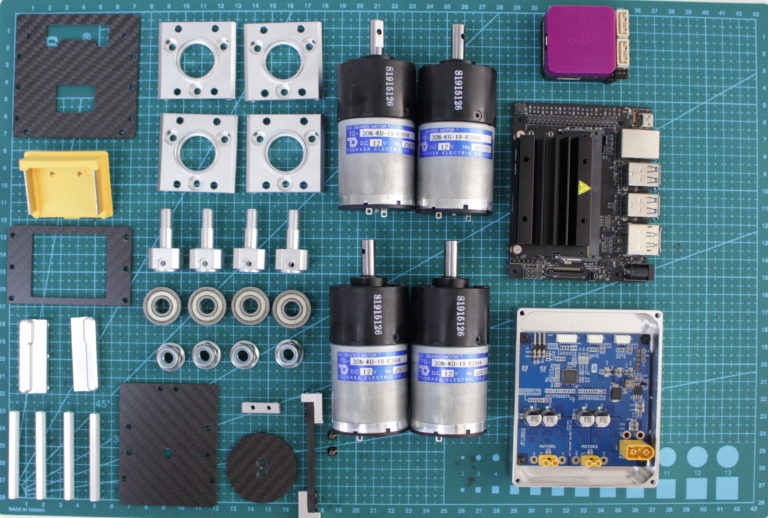
- 2-channels ESC
- NVIDIA Jetson Nano (replaceable with Xavier NX, Intel NUC)
- CUBE purple mini (based on Ardupilot)
- 12V Tsukasa DC gear motor x4
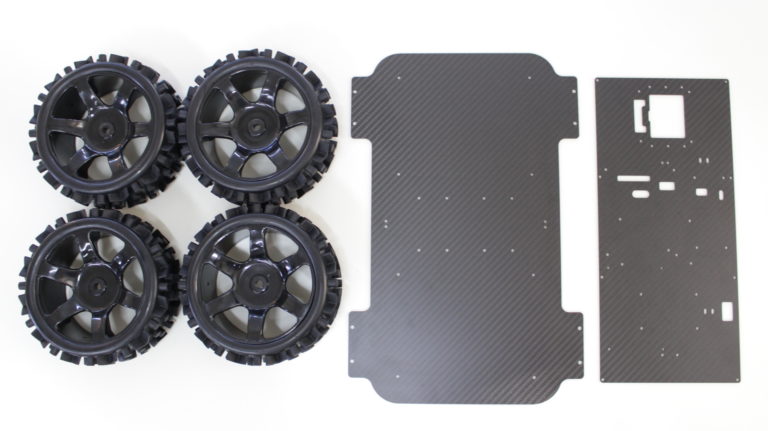
- 160mm diameter crawler wheels x4
- Makita battery 18V 6Ah
- DC-DC regulator 5V 10A (selectable)
- Battery holder and lock
- Upper carbon plate (body)
- Lower carbon plate (body)
- 75mm GPS pole
- camera holder (for Intel Realsense D435, T265, and regular webcam)
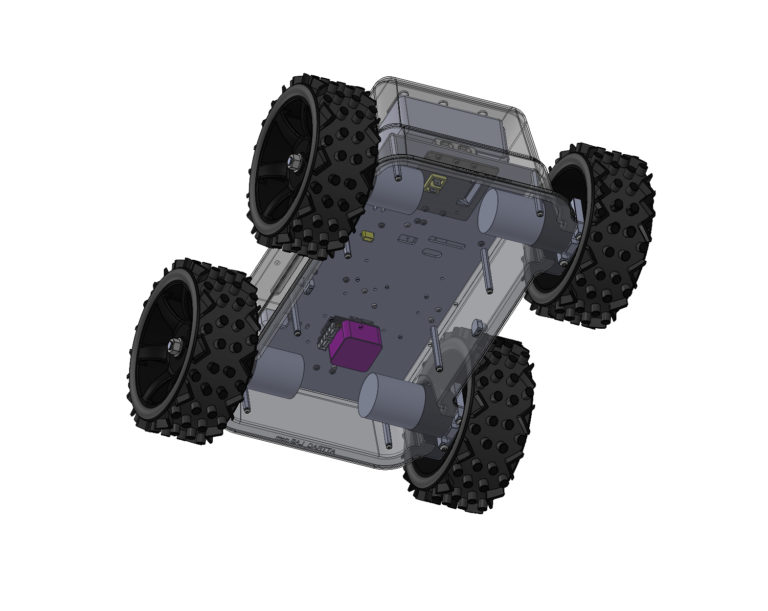
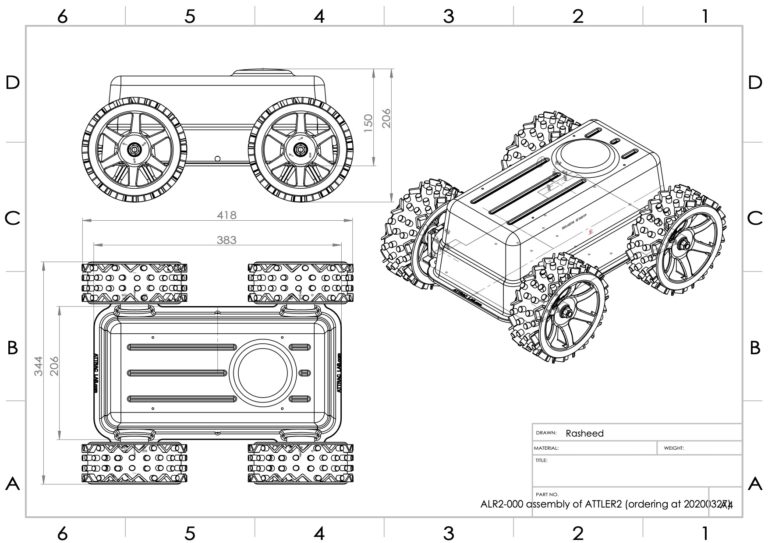
As you can see, ATTLER’s body is very simple. It’s just two simple carbon plates connected together with aluminum pillars and simple aluminum parts to hold things in place like motor bracket, GPS pole, battery holder, and so on.
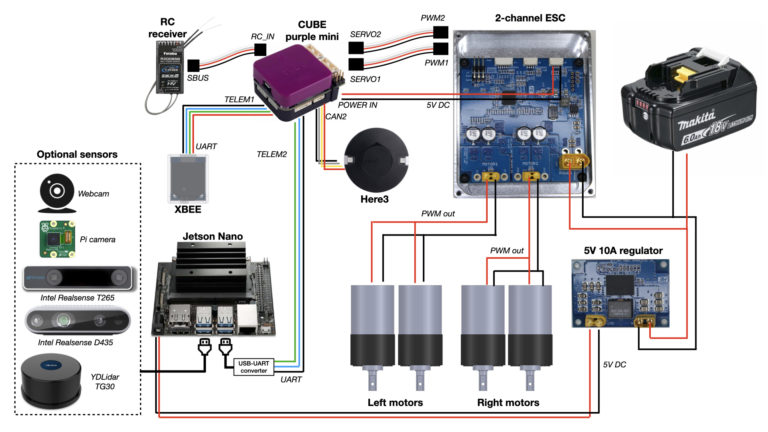
A 2-channels ESC is capable for 8-24V input range, motor1 is for left side wheels and motor2 is for right side wheels, and PWM1 and 2 would be connected to CUBE mini purple at SERVO1 and 2 ports. CUBE’s power input also comes from this ESC also. For other peripherals related to the CUBE like GPS, RC receiver, buzzer, and telemetry, you can follow up on this link https://ardupilot.org/rover/docs/common-thecubepurple-overview.html .
In case we use Jetson Nano, we need 5V 10A DC-DC regulator, but if you need more powerful PC like Jetson Xavier NX or Intel NUC, you can change DC-DC regulator range to match your requirement. Of course, we don’t only focus on outdoor application by using GPS navigation, but an indoor application is also possible, so you can use other source of navigation like Intel Realsense T265 (visual odometry) or LIDAR as well.
You can see more detail or the wiring from following image. The ATTLER rough dimension is also shown on attached drawing, and its weight is around 5kg including a battery.
Ardupilot’s Parameters
- AHRS_ORIENTATION = 8 (Roll 180)
- BRD_SAFETYENABLE = 0 (Disable) We don’t have safety switch on GPS.
- RC7_OPTION = 41 (Arm/Disarm) This depends on your transmitter, you can choose a channel as you like.
- RC8_OPTION = 50 (LearnCruise) This is only for throttle speed controller tuning.
- MODE_CH = 5 This depends on your transmitter also.
- CAN_D1_PROTOCOL = 1 We are using Here3 GPS, and it uses UAVCAN protocol
- CAN_P1_DRIVER = 1 This is also related to Here3 GPS
- GPS_TYPE = 9 for UAVCAN
- NTF_LED_TYPES = 231 This is also related to Here3 GPS
These are just for the basic parameters you need to set before doing accelerometer / compass / RC / motors calibrations. You can check more detail about the configuration of “First Time Setup” on Ardupilot’s site as well, it’s quite well documented! https://ardupilot.org/rover/docs/apmrover-setup.html
Giveaway some tips!
As described before that you can easily follow the step from Ardupilot website, so I would not repeat their job, but I will point out some tips for you!
- I think the accelerometer calibration can be done easily but the problem I found difficult is COMPASS CALIBRATION! which sometime it’s kind of pain in the … Anyway, if you are following the step in here https://ardupilot.org/rover/docs/common-compass-calibration-in-mission-planner.html, you will end up like wrestling with the ATTLER in the air, swing it up and down too many times to make the calibration success (not always succeed…). But hold on… I am here to help you, so all you need is just got to CONFIG page, the click on Full Parameters List, and search on COMPASS_LEARN. You need to set it as 3 for doing the calibration during flight, once you set it then just hit Write Params. So APM will allow you to ARM and let you drive the rover in manual mode, you will see “CompassLearn: Initialised” on the Messages bar of DATA page. So this is the time you will need to bring the ATTLER outside and drive it in circle, turn around, or do some curving. When it’s done, it will show the message “CompassLearn: finished“. No more turning the robot in the air! You can find more detail in here https://ardupilot.org/rover/docs/common-compass-setup-advanced.html#automatic-offset-calibration .
- If you found out the ATTLER turns strangely or won’t stop in ACRO mode when tuning PID steering rate or throttle speed control. The reason might be the left and right motors cable are swapped and steering channel on your transmitter might be reversed as well. At first the steering channel on your transmitter should not be reversed, you should change it back on your transmitter. Then you can change SERVOx_REVERSED parameter and try drive it again.
- Please keep in mind that there would be a problem when using Intel Realsense camera with GPS in the same time. Due to the USB3 radio frequency interferences with 2.4GHz devices, so your GPS accuracy will be affected. This is a known issues and we can try prevent that by keeping those two components as far as possible, and better to shield USB port and camera with aluminum foil.